We've moved!

TechKnack.blogspot.com has officially moved to TechKnack.net. You should be redirected in 3-5 seconds. Thank you.

July 19, 2008

Is your DNS cache poisoned?

Add this post to Del.icio.us. Del.icio.us (0 saved)

Say what?

First, some background on DNS; feel free to skip this paragraph if you know what it is ;) . "Domain Name System" is a distributed system for translating web addresses (Google.com) to IP addresses (64.233.187.99). You type "Google.com" into your browser, the browser (through the computer) sends that address to the DNS, the DNS looks up the address and retrieves the corresponding IP, the DNS sends that IP to your computer, and, finally, the browser can use that IP to contact the appropriate website's server to fetch the content. Each domain has at least one "authoritative" DNS server, which holds the master information for that domain. Other servers in the DNS system contact the authoritative server, and cache the IP address in their own tables. This way, if an authoritative server goes down, less-reliable-yet-still-useful results can be obtained from secondary servers. (This is the way I understand it, please correct me if I'm wrong). OK, moving on.

I was doing some domain name management on FreeDNS a few days ago, when, seemingly out of nowhere, I was getting "error loading page" for that site. I tried a few other sites to make sure my internet wasn't down; I could access Google, but not eBay, with the same situation for a number of other sites. Very strange. Having recently been educating myself about DNS (that happens when you start looking into the details of dynamic DNS ;) ), I immediately assumed that my ISP's (AT&T's) DNS servers were on the fritz. Which, to my knowledge, has never happened before.

So, naturally, I went straight to google with a query: "att dns servers broke". Not the best grammar in the world, but it worked :) . Nothing especially recent popped up under Web results, so I checked out the Blog results, and found this: Your DNS Server is Broken, and Can't Be Fixed. Naturally, that site was one of the sites that my working DNS server(s) couldn't find, so I had to call up a google cached version. 'Twas a scary article.

Basically, there is an inherent flaw in the very design of the DNS system. This flaw allows malicious entities with knowledge of this flaw to poison the DNS cache. This means that they can update the system's cache to point a domain name at their IP address, which, in theory, could be a perfect copy of the original website. This would allow them to redirect major bank websites, for example, to their perfect copies designed to steal your account information. And you, of course, would never know the difference, because the URL bar still says "mybank.com".

Fortunately, the discoverer of the flaw, Dan Kaminsky of Doxpara.com, was a security researcher. And, fortunately, he kept this monumental news quiet and got together with some other security guys and programmers, as well as some of the big names in technology, to work up a workaround. The flaw isn't fixable, but we can make it harder to exploit.

After reading this article, which didn't exactly answer my first question ("Are AT&T's DNS servers down, broken, or worse?"), I headed to the news search. The most recent article there was on Forbes.com: Hackable Broadband Left Unpatched. This article, besides describing the flaw, detailed some major ISPs who hadn't updated their servers as of the day the article was published. To my disdain, AT&T was among them. This may explain the DNS hiccups, though, if implementing this workaround to the main servers is at all a major undertaking.

While sooner is better, the major ISPs (or, really, anyone who runs a DNS server) have until August 6th to update their systems. That's when Kaminsky will be discussing all the gritty details of the exploit in his talk at the Black Hat Briefings. In other words? DNS D-Day for anyone who hasn't patched up yet.

July 18, 2008

SecureSMB Script

Add this post to Del.icio.us. Del.icio.us (0 saved)

Do you have a wireless notebook with Samba shares that contain copyrighted materials? For example, your music collection? But you only want to share it with your Xbox Media Center while you're on the home network -- sharing anywhere else could result in copyright infringement. It's a hassle to disable your shares every time you go somewhere, eh?

Well, I've written a script which monitors your wireless connection and, should you hop on the wrong network, shuts down your Samba service. When you get back on your home network, it restarts the service. Isn't automation wonderful?

Alright, so maybe I have a little too much free time. Whatever. Download the script, try it out, leave your comments here or through email, and enjoy. Distribute it yourself if you feel like it, but leave the bylines intact. Oh, and the script does need sudo/root privileges, so you should probably put it in /etc/init.d or similar.

July 15, 2008

Konqueror's "Create new" Menu under KDE4

Add this post to Del.icio.us. Del.icio.us (0 saved)

A while ago, I posted how to edit Konqueror's "Create New" menu. Unfortunately, installing the KDE4 desktop seems to nullify this trick. This is because KDE4 redirects Konqueror from /usr/share/templates to /usr/lib/kde4/share/templates . Annoying, really. There are two solutions.

First solution is to copy your files from /usr/share/templates to /usr/lib/kde4/share/templates . Then either stop worrying about /usr/share/templates, or sync them whenever a change is made.

Second solution is to symlink (create a shortcut to) /usr/share/templates from /usr/lib/kde4/share. To do this, first move /usr/lib/kde4/share/templates to a "backup" state (like /usr/lib/kde4/share/templates.old ): sudo mv /usr/lib/kde4/share/templates /usr/lib/kde4/share/templates.old Then create the shortcut: sudo ln -s /usr/share/templates /usr/lib/kde4/share/ And voila, you are back to maintaining one directory.

July 12, 2008

Sticky Page Footers

Add this post to Del.icio.us. Del.icio.us (0 saved)

Occasionally you'll be coding out a site, and you want a "sticky footer", a footer that sticks to the bottom of the browser viewport or the bottom of the main content section, whichever is lowest.

There are a few notable sites that have posted methods for doing this, but the short answer is it doesn't work unless you meet certain requirements. Probably the most popular example (which is also the first google result for "sticky footer") is A CSS Sticky Footer. However, as the explanation page shows, the method uses extraneous markup to push the footer down below the content. Also, this method only works with static-height footers.

Another good example comes from AListApart: Exploring Footers. The method involves using relative positioning on a container and absolutely positioning the footer to the bottom of that container. Inexplicably, this works, though for my implementation, I used the body element as my wrapper. Unfortunately, you have to apply appropriate padding or margin to the bottom of the content div, which in turn squashes the idea of having a dynamic-height footer.

Given these examples, which are perfect for fixed-height footers, it seems sticky, dynamic-height footers are not meant to be under current browser implementations. If you're insistent on having a dynamic-height sticky, you'll have to go the way of the faux footer (along the lines of the faux columns, which I've always thought to be cheating :) ). I couldn't find any links talking about faux columns (in this sense, anyway), but one site which currently implements it is KilianValkhof.com. If you look into his code, you'll see that the background of the footer is actually set in the body.

July 9, 2008

Re-associate FireFox 3 with Thunderbird links

Add this post to Del.icio.us. Del.icio.us (0 saved)

After upgrading to FireFox 3, I noticed that ThunderBird was no longer opening links in FireFox. Unfortunately, there are no Preference entries to modify how ThunderBird opens links, which means going into the Advanced Config Editor (the ThunderBird version of about:config). Just Another Tech Blog (among others) details how to configure ThunderBird to open links in FireFox. My problem? I had pointed ThunderBird to /usr/bin/firefox-2 when FF3 came out (I was still using FF2 at the time). FireFox 3, however, is located at /usr/bin/firefox.

July 6, 2008

Fix Duplicate Collection Entries in Amarok

Add this post to Del.icio.us. Del.icio.us (0 saved)

While many people in this digital age prefer to buy music from iTunes (or other online stores) or, probably more commonly, pirate their music through torrents, I prefer to have the physical disc. I don't use the actual disc much; I rip the songs to my hard drive, and never see the disc again. The advantage is no DRMs on the ripped files (and the freedom to use them how I want), a physical backup should I accidentally delete the files, and, when I'm no longer interested in the music, something I can sell without worrying about a RIAA lawsuit.

With that background, I recently bought a bunch of CDs from BMG Music. When the CDs arrived, I went about doing the normal ripping process, with Amarok playing the last CD that I had ripped. After a while of "updating collection", I noticed that a few of my albums in my Collections pane had double tracks, in the form of "track 1, track 1, track 2, track2" etc. Since there were no obvious buttons in the interface to get rid of the duplicates, I turned to google and found a post on the Ubuntu forums regarding the problem. The first few posters found that deleting the ~/.kde/share/apps/amarok directory and restarting Amarok fixed the issue. Then RosenCrantz posted (and pointed to their blog article) saying that you need to delete "just the files collection.db, collection_scan.files and playlistbrowser_save.xml in case of duplicate playlists." While they mentioned duplicate playlists, it makes sense that deleting and recreating collection.db and collection_scan.files would fix the duplicate collection issue. Oh, and then ExBuM came in and said to go to Tools -> Rescan Collection. Whaddaya know, that one worked. :D

July 3, 2008

Find me on...

Add this post to Del.icio.us. Del.icio.us (0 saved)

Seems I've got a lot of social networking accounts under my belt nowadays. From FaceBook to Twitter to Digg to Blogger. While I would like to put a "find me on" widget in this blog's sidebar, it would just add to the clutter. So, in lieu of that, I'll just put links to myself in a blog post. :) The list is in "site - username" format. Here we go...

There are probably more that aren't coming to mind at the moment. Probably mainly because I don't use them that much. As I join other services, I'll add them here.

June 30, 2008

First Impressions of FireFox 3 on Linux

Add this post to Del.icio.us. Del.icio.us (0 saved)

I've been using the latest version of FireFox 2 (version 2.0.0.14) since it hit the Ubuntu repos. On June 27, I decided to upgrade to 3.0 final. I didn't want to, really, until certain addons (not to mention my absolute favorite FF2 theme) had been upgraded with 3.0 compatibility. But FF2 was being so slow with the "memory leaks" that it's become known for lately, I figured I owed it to myself to try it.

First, the deal breakers for me. Obviously, the Vista Black theme by Internauta2000 on DeviantArt. I've loved this theme since I first discovered it, and haven't been satisfied with any other theme I've tried. My most used extension recently, Tab Groups, does one thing and does it well. It simply adds a second row of tabs that group main tabs together. Unfortunately, it does not support FF3 yet. And I can't wait until it does.

When I upgraded to FF3, I made sure to have my system monitor (KSysGuard) open to monitor memory usage. Typically, after a period of sustained usage, FF2 would reach roughly 450MB of memory on linux; on Windows, I've seen it eating up to 800MB. Just a few hours after running around with FF3, though, I noticed it was creeping into the 400MB range. Needless to say, I was starting to be disappointed. Right now, though, and without a restart, I'm seeing only 152MB usage. And the overall experience is much smoother. With FF2, especially during a large memory footprint, it would constantly lock up. When it wasn't locked up, it would hesitantly load and scroll pages. No longer. FF3 loads pages perceivably faster, and there are no glitches in scrolling.

But there's still the matter of those deal breakers. Until Tab Groups gets an update, I've started using FaviconizeTab, which reduces tabs from icon-and-text to icon-only, on a tab-by-tab basis. Mainly just a way to keep all my tabs (which often reach double digits) visible on the tab bar. For my theme, I've converted (oh, so temporarily, mind you ;) ) to the AquaTint Black Gloss theme. It doesn't hold a candle to Vista Black, but it's close enough for now.

Overall, though, the upgrade to FF3 is one that everyone should make. If you have a favorite extension that isn't yet compatible, find an equivalent or an alternative. Or, in the case of FireBug, find the latest development version. If you have a favorite theme that isn't compatible yet, contact the author and ask if they have an update planned (and be sure to say please and thank you ;) ). Most importantly, just do it. You won't regret it.

June 27, 2008

Use Google for UnitConversions

Add this post to Del.icio.us. Del.icio.us (0 saved)

Recently I was doing some quick google-research on sheet paper sizes; I came across a wikipedia image which showed A-sheet sizes -- in millimeters. Being an American who prefers to deal in inches, I did a Google search to get the inch equivalent of 210mm. I expected to find a website that could provide such a conversion for me -- and I found it sooner than I expected: I suppose this feature has been around for quite a while (I found a forum thread dated from '05), but it's such a small feature that it can easily be overlooked. Or, more likely, not seen at all except by those few who have a need for it. ;)

June 24, 2008

Linux-compatible wifi cards?

Add this post to Del.icio.us. Del.icio.us (0 saved)

If you're in the market for a wifi card (be it desktop or notebook) and you're an avid Linux user, you may be interested in knowing if a card will work with linux before you commit to the buy. The authors of passys.nl have set up a user-contributed list of wireless cards and their linux compatibility. You can search the database by manufacturer, chipset, or card interface, and the results are color-coded for easy skimming.

June 21, 2008

Flashing a WRT

Add this post to Del.icio.us. Del.icio.us (0 saved)

To complement my recent XBox softmodding project, I bought a Linksys WRT54G router to install DD-WRT on. For those not in the know, DD-WRT is a third-party, linux-based, model-specific router firmware. It basically does to routers what Ubuntu does to your desktop or notebook, XBMC does to your XBox, and RockBox does to your MP3 player: it unleashes it from the chains of crippling OEM firmware, and unlocks all (or most) of its potential. In the case of DD-WRT, you can control wifi strength, implement QoS, and, with the right settings, use it as a wireless bridge for the modded XBox in your living room. :)

As always, it helps to have the right tools. There are tons of guides to installing DD-WRT, but the one that I ultimately (and successfully) followed was the official DD-WRT installation guide. Given that, you need to know what feature set you want. The Standard version has all the main bells and whistles, minus a couple mass-user-nonessential features, and weighs in at just over 3MB, thus requiring the standard 4MB of flash memory. The Mini version has enough to make you want to install it over your standard firmware, at a lighter requirement of 2MB of flash memory. Check out the file versions for all the details. If you're going for a WWRT54G and want the standard set, then you'll want something between a v1.0 and a v4.0, inclusive. If you look at the Linksys compatibility table, you'll notice that the flash memory and RAM are cut right in half starting with v5.0. Any WRT54G v5.0 or later will require you to install the mini or micro distros (unless you install a card reader or something like that). You'll also notice that v4.0 takes a step down in processing power, from 216MHz to 200MHz. These cutoff points, in my mind, make WRT54G versions 2.2, 3.0, and 3.1 the ideal versions to grab, especially for a first attempt. I ended up getting a v3.0 off of eBay, go figure.

Once you've got your router and guide handy, have fun flashing. Be sure to use Internet Explorer and a wired connection to the router (disable your computer's wifi to be safe) so as not to brick your router. Also keep in mind that, just because you have 4MB flash memory, that doesn't mean that the Linksys firmware will let you use it. Upgrade to the DD-WRT Mini Generic version first; once that's running, you can then upgrade to DD-WRT Standard Generic. Don't use the WRT54G-specific files for an upgrade via the Linksys web interface, as those files are meant for use with TFTP flashes. Follow your guide to a fault and don't panic if something doesn't go right.

Once you've fixed yourself up with DD-WRT, you can turn your WRT into a wireless bridge with 5, count 'em, 5 ethernet ports. As with the installation, there are many guides to turning the router into a bridge, but the one I had success with was the official DD-WRT Wireless Bridging guide. Once you have your bridge set up (be sure to disassociate your computer with the router, and reassociate with it, to ensure that the bridge is working properly), you can head to Setup -> Basic Setup and check Assign WAN Port to Switch. This, theoretically, makes the "internet" port on the router act like a fifth ethernet switch. Although I haven't tested it yet, so I guess I shouldn't be promoting it too heavily. :)

June 18, 2008

XBox Project, Phase 3: Softmodding

Add this post to Del.icio.us. Del.icio.us (0 saved)

Softmodding the XBox, provided you have the right tools, is as easy as installing a program in Windows. Run the given installer, following the step-by-step, and hope everything goes right. Usually it does, until something isn't clearly explained, and then you have to troubleshoot it. Although the key phrase there is "having the right tools".

First things first, you must have the right game and a good walkthrough. There are three games that are exploitable; I used MechAssault, which has to have a disc number of MS02301L. You can get this off of eBay for $20-25 with the disc number explicitly listed; you may be able to get it for less if you can spot it without the number being mentioned. I've also heard of people getting it for $3 or so from a local GameStop, so there's a decent profit to be made if you get it that way. Though I could have used LifeHacker's guide, I ended up using chunkhead's guides at afterdawn.com. The advantage is that he provides a downloadable package containing the AR software and prefab game exploit softmod installers (a lot of guides I found gave you a softmod exploit that you had to insert into a gamesave. Even more pointed you to the #xbins IRC channel, which sends you to an FTP server, which I found most unhelpful. These are pre-built). Check out how to use a USB drive as a memory card to get the softmod installer onto your USB drive; be sure to read through the thread, not just the first post, if you run into problems with the AR software. When you have the files ready, head over to his softmod guide. The screenshots in the second guide don't exactly match the software from the first guide, but they're similar enough that you should be able to figure things out.

Getting the exploits is simple enough: download the zip archive provided at the guide. However, for the sake of completeness, I will describe my experiences while following the LifeHacker guide. First, you must log on to an IRC channel, #xbins, on the Efnet servers. I used Mibbit.com, a web-based IRC client, to sign on to one of the two available Efnet servers. Once there, every guide out there says to PM the bot with the !list command (run "/msg xbins !list"). However, the channel message itself says to !list in-channel to get the FTP login details. Once that's done, the bot PMs you the FTP server and login details, and away you go. I used FileZilla to connect. This worked fine, until I tried to download a file, at which point I would start getting "access denied to user" errors. No matter what I tried, no matter what settings I used, this would always happen. Of course, you have to re-receive the login details after each connection, successful or not. Oh, and if you !list too fast, the bot will kick or ban you from the channel. So you can imagine how frustrating it can be. Yes, there are desirous files on that FTP server that are not provided by chunkhead's guide (such as DVD2XBox, LinksBoks, and other apps), but I found that you can find them on the various torrent sites. And, of course, XBMC you can actually download from T3CH's website.

Now, before you can start moving gamesaves around, you have to format the USB drive with the XBox; simply plug it into your hybrid cable, plug that into the XBox, turn the XBox on. Navigate to Memory on the dashboard. You'll get an error saying either that the memory card was formatted (I got this for my 1GB), or that the memory card may be damaged (I got this for my 4GB). If it says that it's damaged, it may recognize it a second time (unplug the USB drive and plug it back in; worked with my 4GB). Once that's done, it should show up to the side of the main "hard drive" memory source. Move the USB drive to the computer with the AR software on it.

Now, about the Action Replay software, and working with a USB drive. First thing you may want to know is that this probably won't work with wine on linux; I couldn't make it work, anyway. The first afterdawn.com guide contains the AR 1.31 installer and a 1.40 upgrade. Run them in that order. Then follow the directions for using USBView.exe to get your Vendor ID and Product ID, and put those into the appropriate file. Now, you have to understand, the contents of this file specify what devices the AR software looks for as a valid Memory Card. However, it won't work until the drivers are updated to look for them. Simply editing the file won't do it; you have to install the file. Chunkhead's guide has screenshots for Vista, but I floundered around for forever trying to get it to work under XP. After you've edited the file, open the device manager and identify your flash drive. Right click it, select "Update driver...". If it asks you to connect to the internet, select "No, not this time" and click Next. On the next page, select "Install from a list or specific location", then Next. This is the part where I kept getting hung up; do NOT tell the wizard to search in the AR directory for the file! Instead, select "Don't search. I will choose the driver to install", then Next. On the next page, click the "Have Disk..." button, browse to the AR file you edited, and click OK. In the drivers list, a new item will appear that is obviously not your standard computer stuff; select that and click Next. The wizard should then copy and install the necessary stuff. Fire up AR, and you should be good to go; simply drag the appropriate files from your Desktop to the "Memory Card" column, and AR should copy it over to the drive.

Once the files are on the USB drive, move the drive over to the XBox again. Navigate back to memory in your dashboard, and select the "memory card". For each item, press the D-Pad to the right, and you should have the option to Copy the gamesave (took me a while to figure that out, too). Selecting Copy will then give you the choice of where to copy it to, just go with the hard drive. Once both files are saved, load your game and run the exploit.

While in the SID (Softmod Installer Deluxe), make sure you perform all necessary backups. If you feel the need to look at the file system (for example, to make sure your eeprom.bin is backed up), there is a file manager available on the main menu. Otherwise, just follow chunkhead's guide as closely as possible. When you're done, you should be able to boot to your dashboard of choice; mine is UnleashX, though I'm hoping to replace it with XBMC at some point.

When my softmod install was finished, I didn't have an E:\Apps directory, like everyone said I should have. It's safe to simply create this directory through FTP and move your apps into it. XBMC comes in two flavors; the stable version 2.0.1, and the latest SVN build. While the latest build may have more features, I'm finding that I prefer the older stable version, because it allows me to switch back to UnleashX, amongst other reasons (why was this feature taken out??). The latest version of DVD2XBox (0.7.8) doesn't work on my system; it just hangs on the splash screen. I downloaded 0.7.6, and it works great (you can get it from the torrents). I've also downloaded LinksBoks, but haven't gotten around to properly testing it out yet.

So this concludes my hectic softmodding week. As a supplement, I plan on installing DD-WRT onto a Linksys router that I've recently bought and turning it into a bridge so the XBox can go in the living room, under the TV. So much for a weekend project, eh?

June 12, 2008

XBox Project, Phase 2: Hardmodding

Add this post to Del.icio.us. Del.icio.us (0 saved)

This is probably the hardest step involved in this process. Two days of frustration and troubleshooting have resulted in two working XBox/USB hybrid cables, a fried XBox Controller, and a fried 512MB USB flash drive. Yes, fried, complete with that burnt electronics smell, and a distinct lack of functionality. But perhaps I should tell my story :)

I gathered my breakaway cable, 2ft USB cable, scissors, and electrical tape. Theoretically, this would be simple: strip the insulation off the cable, strip each of the four wires inside each cable, tape matching colored wires together, tape it up all nice, and voila. Not so. The first issue came when I opened up the USB cable; rather than the standard black, white, red, and green wires, I was greeted with red, blue, brown, and yellow wires. So I did a little googling, and found a forum user who had come across this same issue. He had mapped out the nonstandard colors to the standard colors, and apparently it worked for him. The combos were (from USB to XBox), red to red, brown to white, yellow to green, and blue to black. So, I connected up my wires according to his info, plugged my 1GB drive to the XBox male to USB female cable and ... nothing. Not even enough power to light up the LED on the drive.

So I posted to an XBox hardmodding forum asking for help and advice. The only thing we came up with was that the wires were not hooked up right. While it made sense that getting the power and ground wires mixed would be damaging, the person who responded to my post said that mixing the data wires wouldn't matter. So I found a multimeter that I could use to test power flow. I did a simple test; the power and ground cables connect to the outer pins of the connector, so I just tested for which pin was connected to the red wire (for power) to make sure I had the cables hooked up right. Contrary to my first source's info, the brown wire was ground, and the blue wire data. I swapped those and, while waiting for a response on my thread, constructed the other cable (USB male to XBox female). plugged the two USB connectors together and tested a controller on the XBox -- no go. So, in slight frustration, I plugged the USB male connector into my PC, just to see if it would work. Again, nothing (not surprisingly).

I unplugged the cable from the computer, disconnected the controller, connected the controller to my still-good breakaway cable, and plugged it into the XBox, and it started vibrating uncontrollably. Obviously not a good sign, and I hurriedly unplugged it. And then I notice the smell. I've smelled burnt out electronics (mostly box fans that stopped turning while the engine was still on), and that was what I smelled now. I plugged the controller back in, to test if any controls still worked, and nothing. So I now have a vibrating paperweight. I'm not sure if the controller was fried when I had the ground and data wires switched, or the power and ground wires switched, though I suspect it was the power/ground that did it.

At this point I was slightly frustrated, having fried a controller, when the horrific thought struck me: I had also had my flash drive plugged into these erroneous configurations. I quickly plugged the drive into my PC, fervently hoping that it would work. And it didn't. The LED came on, but the system wouldn't recognize it. Since I run on Kubuntu, I was monitoring my /dev directory for signs of device sdb and sdb1; these never showed up. At this, I fired up google to find a hardware support forum, and posted another request for help. The time I spent waiting for a response, I left the flash drive in my computer, in the hopes that it would somehow come back to life. And, lo and behold, it started working again shortly after I submitted the post. Of course, while the drive was not working, I also went and ordered a new 1GB U3-enabled Cruzer Micro from eBay, adding another $9 to the total project price. Figures.

Once I got the flash drive to work relatively stably (it was initially giving me all sorts of grief by being sporadically recognized by my system, and spontaneously inaccessible), I tried it again in my hybrid cable. At this point, I had solved the issue with the power and ground wires (turns out the red was ground and the brown was power, which was completely unintuitive), and figured the data cables were fine (switching them up doesn't matter, right?). The drive's LED lit up now, but it refused to be recognized by the XBox.

Fast forward several hours of switching between playing XBox games and performing various multimeter tests on every possible pin and wire of the cables. For some reason, in my intense frustration, I decide to re-swap the power and ground wires, just to see if that would work. In addition to my 1GB drive, I also have a 4GB and a 512MB. I wasn't about to fry my 4GB, and didn't want to chance my 1GB, so I plugged in the 512MB. No light, so I unplugged it, and yet again I smell that accursed smell of burn. My frustration building, I plug the drive into my computer, and nothing. No LED, no sdb, nothing. So, add a 512MB flash drive to the list of Fry's Electronics. Finally, I decided to swap the data cables (what've I got to lose, right?), aided with google-found diagrams of USB pins. Plugged in my now-working 1GB and, like magic, XBox says "memory card formatted". Good freakin' grief.

So, after much severe frustration, here are the CORRECT combinations for the wires, in case you come across an old USB cable with crap color codes:

  • USB to XBox
  • red to black
  • blue to white
  • brown to red
  • yellow to green

However, do not take my word for it!!! This worked for me, but that other color scheme apparently worked for that other user. The best thing to do is to get a multimeter, gather a bunch of USB pin diagrams, and test extensively before plugging anything in to your hybrid cables. Of course, if you manage to get a standardly-colored cable, consider yourself extremely lucky, and get those cables modded and wrapped up as quickly as possible.

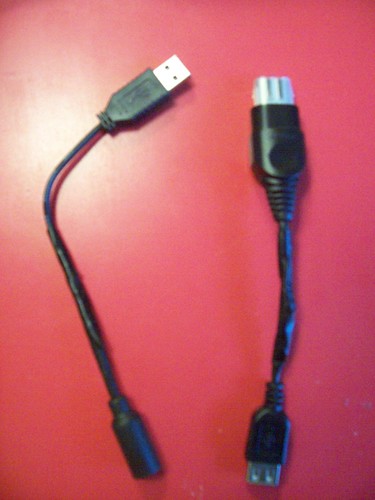
Here's a picture of the final product: Hybrid cables You can see all the pictures I took during the process in my XBox Project Flickr photoset.

June 9, 2008

XBox Project, Phase 1: The Materials

Add this post to Del.icio.us. Del.icio.us (0 saved)

A while back, LifeHacker posted an article on how to turn your xbox into a killer media center. Since that article, I have dreamt of such a thing. About a week ago (shortly after receiving a bunch of b-day money, muwhaha :D ), I decided to take the plunge.

The goal is to take an original XBox, make some small modifications, and install an alternative dashboard in order to unleash the full potential of this small computer. To start off, I'm going to splice an XBox breakaway cable with a USB extension cable. This will create two new cables: XBox male to USB female, and USB male to XBox controller. This will allow me to use a compatible flash drive as a memory card, and the XBox controller as a PC game controller. And, when I need two-player functionality, I can plug the USB ends together, re-enabling XBox compatibility on the controller. I'll then use the flash-drive-as-a-memory-card idea to install an alternative dashboard using a security loophole in a game.

This all rests, of course, on the idea that mass-reported internet information is accurate. In this case, that the XBox controller is a modified USB device. Since many people report this as having worked (both the controller on the PC and the flash drives on the XBox), I'm going to assume that this is accurate.

This all, however, does not come free. Here's what I've spent so far:

  • XBox - $60. Also came with four games, two controllers, and the DVD playback kit.
  • MechAssault - $17.10. Disc # MS02301L, one of the three games that allow you to softmod an XBox.
  • 2 6-ft USB Extension cables - $6. I'll only use one, but you can never have too many USB cables :)

All of these came from eBay, and prices listed include shipping (all prices are USD). The MA game was actually a $19 BIN auction, but PayPal gave me a 10% off coupon code. I should be able to resell it (if I want to) for $20-25 after I'm done. XBoxes, based on my experience, go for $50-70, depending on what they come with, usually controllers. I should be able to recoup some of the XBox cost by selling off some of the games and the DVD kit once I have XBMC installed. Regarding the USB cables, I'm actually going to use a black 2-ft USB extension cable that I already had, but I had to buy something to replace it. And, if anything goes wrong, you can buy extra breakaway cables for $2-5 from eBay. A local gaming store may also have them.

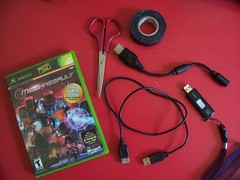
Additional stuff I will need include:

  • Electrician's Tape - Since I don't currently have a working soldering iron, nor am I confident with one :)
  • Scissors - to cut apart the cords
  • 1GB SanDisk Micro Cruzer, U3 capable - to use as a memory drive. I've already got one of these lying around, and have long since removed the U3 junk.
  • Cable strippers - depending on how I decide to strip the cables (strippers, scissors, razor knife, teeth, etc :) )

The materials needed

June 4, 2008

140 characters, are you kidding me???

Add this post to Del.icio.us. Del.icio.us (0 saved)

After long holding back from joining Twitter, for fear of the addiction that it would surely cause, my self-control finally wore down and I signed up. First thing I notice? I only get 140 characters for each "twit"! This will not be possible; I find it sometimes difficult to obey 500-character limits on some forums, let alone a single thought in 140 characters. I'll have to do something like ... um ... posting three twits in a row. Goody, goody. :)

Also, what do I do about links? I'll surely have links to articles and stuff every few twits. I guess I'll be making extensive use of tinyurl.com.

Well, at any rate, wish me luck ... follow me ... do whatever you fellow twitters do ...

Oh, and to top it all off, I also registered on FriendFeed.

June 1, 2008

I thought only Windows did this?

Add this post to Del.icio.us. Del.icio.us (0 saved)

I ran aptitude dist-upgrade last night, and shortly after the update I received this surprising notification: I did notice that a kernel update was in the mix, so maybe installation reboots are exclusive to kernel updates, but it was a surprising notification nonetheless.

May 27, 2008

Second Look at "Official" XP SP3

Add this post to Del.icio.us. Del.icio.us (0 saved)

Last post I detailed how I installed Windows XP Home SP3 on my long-distended Windows installation, only to find a couple rather major issues. Here's the follow-up.

I successfully removed SP3 (after clearing yet more space - it needs 376MB just to uninstall!). Upon the mandatory reboot, I first attempted to login to my limited user account, only to find that it had the same problem initiating explorer.exe, so I assume that that problem was present before I installed SP3 in the first place.

I logged into my Root account (still SP2, mind you) and found that I could use my themes as I wished. So far, so good.

I then went to the Microsoft Update website, planning to download the update through that. As the "download" progressed, however, I decided it was going too slow and did some searching for alternative means of installation. I found the Network Installation, roughly 316MB. Click the download link, select "run", and wait. When the download was completed, I went through the steps of installing SP3 and rebooted.

At this point, I didn't even worry about my virtually lost Limited User account; best to just copy it to a new account and get rid of it. Logging back into my Root account, I was pleasantly greeted with the Silver Luna theme (I had switched to the default Luna theme and changed colors to silver before installing). I located and downloaded a UXTheme patch for SP3, applied it, rebooted (again!!), logged in, and checked out my theming capabilities. I was greeted with full theming glory.

So, one of the most common Windows Troubleshooting Tips fixed my issues: "If it's messed up, reinstall."

Now that that issue's fixed -- back to linux!!! :)

May 26, 2008

First Look at "Official" XP SP3

Add this post to Del.icio.us. Del.icio.us (0 saved)

A couple days ago, I booted into my Windows XP Home installation (yes, blasphemy, I know) in order to pull some pictures off of a Sony Memory Stick, since Ubuntu doesn't seem to recognize the card when I plug it into my card reader. In the course of performing the Windows Updates that I had long been delinquent on, the MS Update site offered to let me download and install Windows XP SP3. I had some free time so, heck, why not?

Since my switch to nearly-all-linux, I had shrunk my Windows partition down to the minimum to hold all the programs I had installed, the OS itself, and about 1 GB of free space. Seems my 1 GB had been reduced in my sparse Windows use; the SP3 download required roughly 370MB, and the installation another 370MB, and I had to find just a tad more free space. :)

After the install (and the ever-needed reboot), there were a couple major problems with my computer. Most major was the complete destruction of my theme capabilities. I'm quite fond of the infamous UXTheme hack; however, after applying the hack for SP3 (and probably before, but I'll have to check), I could not use any UI themes, not even the default Luna theme. I kept getting an error that the theme couldn't load because the file couldn't load... The visual styles could not be loaded because the file failed to load.  Details:

As tragic as it is that I could not use any window themes, at least I can still use the computer. Well, my Root account, anyway; my limited user account threw an error when I logged in saying that explorer.exe couldn't initialize properly. Clicking the OK button continued the login process, only to login to a completely empty desktop. Explorer failed to load, which in turn kept the desktop, taskbar, etc from loading. I was able to pull up the Task Manager, but attempting to start Explorer.exe from the new task option threw the same error. The aplication failed to initialize properly (0xc0000022). Click on OK to terminate the application.I was able to "work around" this major issue by creating a new limited user account (which logged in perfectly fine), but I ended up running out of space while attempting to copy the Docs & Settings directory from the old account to the new account.

Turns out SP3 is placed in the Add/Remove programs list. I'm going to uninstall SP3, check if any of these problems reoccur under SP2, then try re-installing SP3 and see if it works any better. Maybe I messed something up during the install. Or maybe SP3 isn't ready for the masses yet.

May 20, 2008

Must-Have Plasmoid: QuickLauncher

Add this post to Del.icio.us. Del.icio.us (0 saved)

KDE4 is great. I've always enjoyed the idea of widgets, ever since I discovered Konfabulator back on Windows. However, in the journey from KDE3.x (with panels) to KDE4 (with optional panels and plasmoids), one key component was lost: the quicklaunch menu.

For most plasmoids, you either get it with the default plasma installation, or you can install the extragear-plasma package. (As of Kubuntu Hardy Heron) Neither one of these has a replacement for the quicklaunch menu. The QuickLauncher plasmoid is available from the plasmoids section of KDE-Look.org. The author currently offers a source tarball as well as packages for Kubuntu Hardy (x86) and Mandriva (x86, amd64, and "source-RPM").

The plasmoid still has some quirks that require you to edit configuration files. Add it to your desktop, and it is initially empty, with no indication of its existence. I haven't tried using it with the panel, perhaps someone can enlighten me on that point. To initially populate it, open up a file manager to /usr/share/applications. This will have a bunch of .desktop files which link to various applications. It may also have one or two "kde" directories, which contain KDE3- or KDE4-specific applications. Choose your initial quicklaunch application and copy the .desktop file's path (like /usr/share/applications/kde/konqbrowser.desktop for Konqueror). Open a text editor, such as Kate, and open the file ~/.kde4/share/config/plasma-appletsrc . Don't edit it yet. Press Alt+F2 to bring up the application runner, type "kquitapp plasma", press the Launch button, and don't panic. This will shutdown the plasma desktop (causing the plasmoids and panel to disappear), but your windows (and window manager) should stay where they are. Click inside the Kate window, and Kate should tell you that the plasma-appletsrc file has changed. Choose to reload it.

If you haven't removed the "invisible" quicklaunch plasmoid yet, you should see a section near the bottom of the file that looks like this: [Containments][1][Applets][85] geometry=169,520,24,48 locked=false plugin=quicklauncher Note the plugin=quicklauncher line, telling you that this section controls the parameters for the QuickLauncher plasmoid. Paste the path to your .desktop file a couple of lines below this section, and add "iconUrls=" before it, like so: iconUrls=/usr/share/applications/kde/konqbrowser.desktop Copy the first line of the section you located, and paste it one line above the iconUrls line. Then add "[Configuration]" to the end. The final section should look something like this: [Containments][1][Applets][85][Configuration] iconUrls=/usr/share/applications/kde/konqbrowser.desktop Save the file, press Alt+F2 again, type "plasma", and click Launch. Plasma should load, and you should have the Konqueror icon sitting on your desktop, waiting to be clicked.

To add more shortcuts to QuickLauncher, simply re-open Konqueror to /usr/share/applications , and drag-and-drop any .desktop files on top of the existing icon(s) in the QuickLauncher. You can also drag-and-drop to re-organize the icons within the launcher. To remove an icon, right-click the icon and choose "Remove Icon" from the menu.

The configuration dialog for QuickLauncher allows you to choose how many rows it has and how many visible icons it shows. For a single-row quicklauncher, set "rows" to 1 (obviously enough). For a one-column quicklauncher (my current preference), set "rows" equal to or greater than the number of icons you have.

May 17, 2008

AdSense Videos Not Necessarily Good

Add this post to Del.icio.us. Del.icio.us (0 saved)

In my last post, I "introduced" AdSense's new Video Units. I also railed against the size requirements a little bit in that post.

Now. Taking a step back, let me ask a question. What is the purpose of ads (AdSense ads in particular)? For most legitimate cases, the purpose is to enhance a page's content with topic-relevant alternative links, with the main incentive of earning a few cents per click. Note the word enhance, meaning "to add value to". You put ads on your site in the hopes that the links provided will provide enough potential quality that the user will click through. Now, another question: what do videos, the marketing tool of the Information Age, do by their very nature? They grab your attention, and they grab it hard! Have you ever found one specific video on YouTube, watched it, and immediately been pulled in to the "related videos" journey? Mm-hm. Guilty as charged :) . The "traditional" (if I may use the word here) ad system is to place a text block (which is easily skimmable, by the way!) within our content, where it sits quietly by in the hopes that some user may grace it with a mouse click. This new version? GRAB the user's attention away from the main content, and perhaps they might click the overlay ads in the process. These video ads, as big as they are, will steal the limelight from your content, if not placed appropriately. Really, I don't think the current sizes have an "appropriate" placement. You can either place them intrusively up front where they steal from your content, or you can place them out-of-the-way (long after your content) where they'll hardly be noticed.

Now, you'd think that's great, right? Grab their attention straight to the ad unit itself, no trouble? Well, it might be, if the overlay ads themselves were noticeable. I just added the mini player to my blog and played the first video on it, and the overlay ad was so annoying and detracting from my video experience so badly that I quickly hid it. That's right, there's a "close overlay ad" button. It reduces the entire money-making mechanism to a little "show ad" button in the bottom-right corner of the player. Now, how many people do you think, after having hidden the ad that was so darned annoying, will re-open that same ad to see if they want to click it? Certainly not me. I have more content to look through, and better things to do with my time.

Come to think of it, I might not even press the play button.

May 14, 2008

AdSense Videos

Add this post to Del.icio.us. Del.icio.us (0 saved)

Seems Google has one-up'd their AdSense service to include full-on YouTube videos. You can embed a video player in your website which will play YouTube videos with overlay ads.

To create an AdSense video unit, you must first own both an AdSense account and a YouTube account. Following the links from within the AdSense website, you must link the two accounts together (fairly straightforward). Once linked, YouTube will put you on the video unit setup page, where you can add a name and description, color scheme (nine available at time of writing), size (Mini 400x415, Standard 500x510, and Full-Sized 780x560 -- yikes!), and content. The content options seem the most difficult part to figure out; a "keywords" field is offered, but all my attempts at using only keywords failed. You can also pick-and-choose from categories. Once a "search is successful", you are presented with a bunch of YouTube channels from which to choose your content. The "Channel Picker" offers the helpful hint "Click on a content owner to preview their information." The information? Their name, a link to their YouTube page, when they joined, how many channel views they've had, and, if you're lucky, a picture. Nothing useful enough to choose what content my viewers might enjoy. It does offer a "preview videos" button, which returns a table of video thumbnails with links you can click through to view the corresponding videos. Sorry, still not enough to accurately filter my content. Anyway. Moving on.

The smallest player, 400x415, is not "small". Granted, everyone has screens that are 1024x768 at a minimum (I myself use a 1440x900 notebook), but the browser no longer occupies the entire screen. I keep my FireFox window constantly at 1024x768 with the help of the Web Developer extension, and this "Mini" player is anything but mini. I suppose it does depend on your website's layout, of course, but seriously. 400 pixels wide is pretty "intrusive" by my standards; my current blog layout allows only 512 pixels for content width, and about 230 pixels for the sidebar content. Gimme something that's 200 pixels wide or less ("Micro" size, perhaps :D ), and hope it doesn't lose too much quality.

I know, I know, they've only just released it, more options will come with time and development, give em a break, right? Fine. I'm not really for the idea anyway, but that's another post.

Now, just because I'm not for the idea, doesn't mean I won't try it. I've added a "mini" sized player to the bottom of the blog, and we'll see how it goes. Enjoy the LockerGnome :)

May 11, 2008

Lists, Useful For More Than Menus

Add this post to Del.icio.us. Del.icio.us (0 saved)

I came across a page recently that uses ordered lists for the entire layout -- not just the menu. The entire layout is in two parts: one ordered list for the header/body/footer, and another ordered list for the three columns inside the body.

I find this to be an interesting approach to multi-column layouts. Better yet, the author claims that it works in all major browsers on the three major operating systems.

However, are ordered lists the proper elements to use in this case? Is it "semantically correct"? What about unordered versus ordered lists? It'd be terribly simple to convert the layout to work with unordered lists, but which is more "correct".

Regardless of correctness, though, "no floats, no divs, no clears" is rather appealing.

May 8, 2008

Circular Menus and Usability

Add this post to Del.icio.us. Del.icio.us (0 saved)

Circular menus. Ever heard of them? I'm not sure if they have an "official" or "common" name, but this name is pretty descriptive.

Circular menus are superior in usability to the typical rectangular slide-out menu. Why? Because, ideally, each menu item is the same distance from the initial pointer position as each other item. Look at the iPod buttons, for example. Play/Pause, the most common function, is in the middle, and the other functions are equal distances from there.

Also check out the SecondLife context "spin menu". The pie pops up surrounding the cursor, and all the available options are an equal twitch away from the center.

Submenus? Just expand the circle. For example, here's a quick mockup I made converting much of my current FireFox context menu into a pie menu:

But how feasible would such menus be inside a website? WebToolkit.info has a mostly-working demo that uses images exclusively. I tried substituting text for the images, but the menu simply disappeared.

Credit for image: iPod image and SecondLife image

May 7, 2008

Blogger Scheduled Publishing

Add this post to Del.icio.us. Del.icio.us (0 saved)

Seems I'm a little late :)

Finally! Blogger now officially supports Scheduled Publishing! Simply create a new post, click the "Post Options" dropdown (next to the Labels field), set "Post date and time:" to a future date, and publish. The post will then be filed as "Scheduled".

To view your scheduled posts, go to the "Posting" tab, select "Edit Posts", and choose to show either "All" or "Scheduled" posts.

'Bout time :D

May 5, 2008

Migration tips?

Add this post to Del.icio.us. Del.icio.us (0 saved)

For a while now, I've been considering migrating this blog from Blogger to WordPress. I've never actually used WordPress before, but I've heard lots of ranting and raving about this WordPress plugin and that WordPress plugin. I love FireFox and its extension capabilities, and the idea of using plugins for stuff on my blog is very appealing. Even better, WordPress has a New Blogger import tool, which claims to make the transition rather easy.

The main holdback I have is forwarding existing traffic. I already use Feedburner, so forwarding my RSS should be a snap. But what about Google traffic? What about all those blogspot-centric URLs I've scattered about the net? They will inevitably link straight here, but is there a way to automatically forward incoming links to the new location? And what about the ever-important (sarcasm) technorati ranking? Granted, I'm only rank 17 right now, but I'd rather not lose what little "credibility" I have.

Does anyone have any tips for a truly seamless Blogger-to-WordPress transition? Or at least some tips on maintaining my current traffic?

May 1, 2008

Maintain Your Linux Desktop Through a Fresh Install

Add this post to Del.icio.us. Del.icio.us (0 saved)

This article assumes, for the most part, a reasonable familiarity with sudo, cp, mv, and other simple command line commands. It also assumes that you backup your important data, as any experienced computer user will tell you to. In addition to your important data, you should backup the new versions of the discussed system files, for the simple case that you mistype something and your Ubuntu won't boot, you can go in with a LiveCD and restore the fresh-install-version without much trouble.

With the release of Hardy Heron, many X/K/Ubuntu users will upgrade to the new version. Many already have. While an actual upgrade is possible, my preferred method of "upgrading" is through a fresh install. This resets everything to "factory settings", as it were, getting rid of any junk left lying around from your various tweakings. A fresh start, so to speak. But what about your already carefully-crafted desktop experience? In my experience, I've found that there are a number of things you can do to maintain your desktop through a fresh install.

The main thing you'll want to do is create a /home partition. PsychoCats has an excellent guide on moving your existing home directory. On my system (60GB hard drive), I have allocated about 5GB to my root ( / ) partition, various small amounts to a couple of other partitions, and the rest to my /home partition. Currently (using Kubuntu Gutsy and after installing/uninstalling several programs), I use about 4GB of that 5GB. The benefits of a separate /home partition is that, since all your personal settings and files are stored there, you can safely leave that data untouched during the install.

The next thing to do is to backup all your system-wide settings. This includes your wallpapers (if you're into that sorta thing), sources.list, xorg.conf, fstab, and possibly your grub menu.lst. These are the main things that normally need reconfigured after a fresh install. You can create a new directory on your desktop (which won't be erased if you have a separate partition for it), and put all the backups in there, so they're easy to get to when you're ready to restore them.

If you're into collecting wallpapers, you'll likely want to backup your collection. Whenever I switch to a new wallpaper, I first put it in /usr/share/wallpapers. If you do the same, you can simply copy this folder to the new folder on your desktop. For the rest of the backups, just copy /etc/apt/sources.list, /etc/X11/xorg.conf, /etc/fstab, and /boot/grub/menu.lst to the folder on your desktop. You can use the folowing commands to do it all relatively quickly: $ cd ~/Desktop/ $ mkdir backups $ cp -r /usr/share/wallpapers /etc/apt/sources.list /etc/X11/xorg.conf /etc/fstab /boot/grub/menu.lst ~/Desktop/backups/

A quick explanation of the files to backup: the sources.list tells apt-get where to search for available software. I use several programs which are not in the official Ubuntu repos, and this usually involves adding third-party repos to my sources.list file. I like to back this file up so I don't have to go hunting yet again for the repo info.

The xorg.conf file holds your display settings and other settings relating to on-screen display (such as mouse configuration). Every time I reinstall on my notebook, I have to go in and manually modify the xorg.conf file to enable horizontal scrolling on my synaptics touchpad. Backing up the file allows for quick and easy editing, instead of trying to remember my settings.

Fstab specifies automount details for various partitions. I have two partitions other than my root and home partitions that are setup to automount, as well as several Windows shares that are specified in fstab so as to automate mounting them.

You really only want to backup your grub menu.lst if you have manually modified it for whatever reason (for example, if you have a dedicated grub boot partition). If you normally let Ubuntu auto-config the boot options and don't touch it afterwards, you probably don't need or want to back it up.

Install X/K/Ubuntu as normal, specifying your home and root partitions, and ensuring that the installer does NOT format the home partition. You will be required to format the root partition. During the install, you will also want to create any user accounts that you had before, in the same order that you previously created them. User recreation can also be done after you boot into your fresh install, by using the useradd and usermod commands.

After the install, boot into your shiny new installation. Since you'll need to use root privileges (sudo) to re-integrate your files, you may want to log into a fail-safe desktop. This will give you a command line window, but no window decorations, panels, etc. You won't need them anyway, yet. To view the contents of files, use the "nano" text editor. Do not simply copy all the files back to their original positions. When a distro is upgraded (or reinstalled), system files have a tendency to get modified (case in point: your sources.list). What you want to do is compare the differences between the old and new files, and make changes as appropriate.

First, move your wallpapers back. You can do this without deleting any new, "official" wallpapers by running the command $ sudo cp -r ~/Desktop/backups/wallpapers/* /usr/share/wallpapers/

For the sources.list...well...I don't know of any good way to check for updated repos, other than to change the "gutsy" to "hardy" for each repo line, and run "apt-get update". If the repo doesn't exist, you'll get some output like: Ign http://repo.freecreations.info hardy Release.gpg Ign http://repo.freecreations.info hardy/freeverse Translation-en_US Ign http://repo.freecreations.info hardy Release Ign http://repo.freecreations.info hardy/freeverse Packages Err http://repo.freecreations.info hardy/freeverse Packages 404 Not Found From there, you could try to pull software from your previously-used gutsy repos, but I really have no clue how stable that would be :)

Moving on to xorg.conf. Simply look into your backup file, find out the settings you want, and add those to the appropriate places in the new xorg.conf. You will need to use sudo to edit /etc/X11/xorg.conf with root privileges. The same goes for your grub menu.lst.

For fstab, unless you made some change to your partitions between backing up and reinstalling, you should be able to simply "sudo cp" your old fstab over your new fstab. Of course, you should backup the new fstab, just to be safe, and compare all the numbers afterwards to make sure everything will work after your next reboot.

Now that you've restored all your settings, you should be able to reboot, log into your normal session, and enjoy your familiar desktop experience under the new distro. After reinstalling all your software, of course :)

If you find any part of this guide to be lacking in detail, first use Google, secondly email me at eternicode at gmail.com or post in the comments. As of this post, I have not, myself, aupgraded to Hardy, but I did use this very method to upgrade from Feisty to Gutsy, and I believe this process to still be good for the current distros.

April 28, 2008

Compiz: The Ultimate in Useless Eyecandy?

Add this post to Del.icio.us. Del.icio.us (0 saved)

That's right, it's time for a technologically controversial post. :)

Compiz is the ultimate in eyecandy. Seriously. With wobbly windows; various window-switching mechanisms such as shift-switcher, ring-swither, and regular tab-switcher; a multi-desktop cube; Mac Expose-style effects; some wicked screensavers; and a whole array of window opening, closing, minimizing, focus/unfocus, etc animations, it clearly outshines Vista and OS X combined. It's also pretty darn efficient - as I type this, Compiz is using no more than 12MB of memory, and I rarely reboot my machine. :D

However, as cool as it is, I find myself using very, very few of the available plugins in my daily workflow. With my current setup, I have all three window switchers; a four-desktop cube; wobbly windows; open/close "glide", minimize/unminimize "genie", and focus/unfocus "fade" animations; current-desktop and all-desktop Expose effect; show desktop; and the spinning cube screensaver enabled. Of all these functions, though, I only use the cube regularly. I have it setup so that Alt+Ctrl+Left/Right arrow spins the cube, and I use that for switching between desktops. For switching between windows? I use Avant Window Navigator. With an icon for each window, I just click on the one I need to go to. And, of course, the animations, screensaver, and wobbly windows are ever-present and fairly unobtrusive. I just find that the majority of the available effects aren't useful in my everyday workflow. I mean, fish inside my cube? Drawing on my screen with fire? Not only not useful, but a nonproductive use of resources. :)

I suppose the purpose of having so many effects, other than sheer amount of eyecandy, is choice. However, choice or not, a lot of the effects are just plain useless, such as the aforementioned Aquarium plugin.

What plugins do you use on a daily basis, if any? And which plugins do you have enabled that merely gather dust? :)

April 25, 2008

Hardy Heron Up For Download

Add this post to Del.icio.us. Del.icio.us (0 saved)

Ubuntu version Hardy Heron (8.04) was officially set loose yesterday. Existing users can upgrade (instructions available for Xubuntu, Kubuntu, and Ubuntu), download (X/K/U), or torrent (some on LinuxTracker, as well as the official Xubuntu, Kubuntu, and Ubuntu downloads [Xubuntu link was not working last I checked; for Kubuntu, select a mirror site like OSU Open Source Lab to find the torrents]).

Also available from the Kubuntu side is the Kubuntu-KDE4 remix.

Edit: Newly seeded by yours truly, Kubuntu 8.04 and Kubuntu 8.04 KDE4 remix ISOs. Both i386-desktop versions with MD5SUM files.

April 22, 2008

Character Maps for Linux

Add this post to Del.icio.us. Del.icio.us (0 saved)

Ever had to make use of special characters? For example, to put an equation like ∫x² dx in an OpenOffice document? How do you get at those characters, anyway?

In Windows, there's the Character Map, via Start Menu -> Accessories -> System Tools -> Character Map. For KDE users, check out kcharselect. Gnome users should look at gucharmap. I've not had experience with gucharmap, but kcharselect has a very good search feature, "categories", and a description of the selected character.

April 19, 2008

Alternative Link Underlining

Add this post to Del.icio.us. Del.icio.us (0 saved)

Ever seen the odd site that, instead of solid or absent underlining, has a dotted or dashed underline? Ever wonder how it's done? It's really simple: border-style.

All you need to do to get an alternative underlining effect is to, first off, hide the default underline with text-decoration:none, and then specify a bottom border for the affected links: a:link { text-decoration:none; border-bottom: black dashed 1px; } To make the effect stand out, you could also make the link and border separate colors, either on hover or all the time.

April 16, 2008

Easy Linux-to-Windows File Sharing

Add this post to Del.icio.us. Del.icio.us (0 saved)

Samba has long been the defacto standard for accessing Windows file shares from Linux. However, there is also a Samba daemon (background service) that, if configured correctly, plays the reverse role -- sharing Linux directories to Windows machines. Unfortunately, proper setup requires you to edit the /etc/samba/smb.conf file, which, like most configuration files, can be rather cryptic.

Enter the GUI solution: system-config-samba. That's the package name in the Ubuntu universe repositories, I don't think the program itself has a proper name other than "Samba" (also check out the Fedora project wiki for the app). It's a sparse little app that gives you GUI access to the settings of the smb.conf file. Once you get the behind-the-scenes details set, though, adding shared directories is a snap.

First make sure you have samba installed (package "samba" in Ubuntu repos). Next, install the samba config package - "sudo aptitude install system-config-samba". The installation should put an entry called "Samba" in your Ubuntu menu (for me, using Kubuntu, it's under "Settings"). If you can't find it there, you can start it from a command line by running "system-config-samba &". Before the program starts, it will ask for your administrative password (same as your sudo password, unless you've changed something around).

Once at the main window, You can begin to appreciate how simple SCS makes configuration, using three main buttons that are very self-explanatory, along with a simple list of currently shared directories.

Before you start sharing, you'll want to setup the basic, general details. Open Preferences -> Server Settings. In the Basic tab, set your Workgroup (the default for Windows machines is usually "MSHOME" -- make sure all your computers use the same workgroup name, to avoid issues) and the computer description. In the Security tab, you set the sharing settings. For my home network, which sits behind a router, I use the "Share" authentication mode and set the guest account to my account, to allow open access to my shared directories. Once that's done, click OK. The program may seem to hang for a second or two - this is just the program restarting the Samba daemon for you, and happens everytime you change the settings for Samba or for a share. Next, setup a new share. I have a separate partition that contains all my music ripped from CDs. Within Kubuntu, I mount this partition as read-only, and remount it as read-write only when I need to modify the files (for example, add new rips or coverart). Here I'm sharing it to "everyone", read-only, under the name "music". Check out nixCraft for a quick rundown on Samba permissions.

If everything is right, you should now be able to access the Samba share from a Windows machine on the same network. I haven't tried this method for accessing the share from a Mac, but presumably you can use the same methods you would use for accessing a Windows share.

April 12, 2008

Pretty Up Your Forms with CSS

Add this post to Del.icio.us. Del.icio.us (0 saved)

Download Example

Let's face it: form elements au naturel are NOT pretty. So what do we do with them? We add a border thickness here, a border color there, leaving the whole thing largely unchanged. And still ugly. Time to change that.

I'm going to use the Tableless CSS Forms code provided by DynamicDrive's CSS library contributors. This gives us the basic layout and essential elements without too much trouble:

We'll start with the basics: borders and background. In Web 2.0, simplicity is king. Beveled corners? Sooo Web 1.0. Sooo not pretty. We'll make the borders solid, with uniform color, and thin to keep the simplicity. And we'll specify a white background to avoid any cross-browser issues: .cssform input, .cssform textarea { border:#999 solid 1px; background:#FFF; } A nice, neutral gray tones down the harshness of the input areas' borders, and the solid-1px all the way around eliminates any doubts as to where the areas begin and end.

Next we want to make it a li'l roomier. How do you like cramming text into zero-padding textboxes? .cssform input { padding:3px 5px; } .cssform textarea { padding:5px; } Here's when you start getting into trouble with the disparities in browsers' box models, though as long as the width of the elements isn't an issue, you should be fine.

Now that we've covered the foundation, time to break out the makeup: images! Using a very small, very subtle gradient image, we can add a simple inner shadow to each input field. While this is "adding features", I feel it actually adds to the feeling of simplicity: .cssform input, .cssform textarea { border:#999 solid 1px; background:#FFF url(formgrad.png) repeat-x top left; } The gradient image is a 1px wide by 15px high PNG image with a gradient of hex colors #EEEEEE (top) to #FFFFFF (bottom). The slightest difference in color makes for a very nice effect.

We could very well stop here -- all the form elements are styled nicely, even the submit and reset buttons. But why stop there when you can make the buttons intuitive as well? .cssform .submit { background:#FFF url(submitgrad.png) repeat-x bottom left; } .cssform .reset { background:#FFF url(resetgrad.png) repeat-x bottom left; } Here we use another technique found at DynamicDrive. This simply adds two other colored gradient images to the background of the appropriate buttons. Of course, you must add the appropriate classes to the buttons for this to work. If you want to take full advantage of CSS standards and leave IE6 and below behind in the dust, you could just use the attribute selector: .cssform input[type="submit"] { background:#FFF url(submitgrad.png) repeat-x bottom left; } .cssform input[type="reset"] { background:#FFF url(resetgrad.png) repeat-x bottom left; }

And there you have it. With no more than three images (or one, if you prefer), some very simple CSS, and an eye for simplicity, we've made our form elements nice looking.

Additional links:
Download the example
DynamicDrive: CSS Tableless Forms
DynamicDrive: Stylish Submit Buttons

April 9, 2008

Do we really need the br element?

Add this post to Del.icio.us. Del.icio.us (0 saved)

Do we really need the lowly <br/> element? Apparently the W3C thinks so, with HTML5 containing the element. I mean, seriously, what does it do that a span styled with display:block; can't?

The last two times I've seen it used were in articles about creating a tableless photo gallery and making a CSS block nav menu. In both instances, the br was used to drop down the descriptive text to the next line. In both instances, a span surrounding the descriptive text, and with its display set to block, does the exact same thing.

I suppose an argument could be made about users with CSS turned off. In my opinion, though, if you have CSS turned off, you're willing to deal with a few minor inconveniences. If you're that worried about them, throw in a space before the span for readability. And if you really insist on giving them the extra lines of text -- there's always the naturally-block-level <div>.

And what about screenreaders? I doubt they'd be affected either way (it is whitespace, after all -- right?), but I really have no clue. Perhaps someone who uses a screenreader could tell me, after chewing me out about my own blog's (actually Blogger's) screenreader-friendliness. :o

April 6, 2008

Put intrusive KDE4 apps in their place

Add this post to Del.icio.us. Del.icio.us (0 saved)

If you've installed KDE4 -- the whole shebang in one fell swoop with "sudo aptitude install kde4" (on Ubuntu) -- you'll have noticed that the environment insists that you use the new-and-improved "KDE4-ready" apps. These apps have package names like "kopete-kde4" and "ark-kde4". However, newer is not always better. Maybe the new version, using the new Qt4 widgets, doesn't have as "clean" an interface as the old version -- Konqueror a case in point, though more due to its changed interface than the use of Qt4. Or another small example: kopete (kde3 version) supports IRC chat, while kopete-kde4 seemingly does not. Yet whenever I type "kopete" at the command line or, more commonly, when it opens at startup, kopete-kde4 pops up. Either way, gimme my old app!

Turns out that part of the KDE4 install process adds a path to the beginning of your PATH variable, /usr/lib/kde4/bin. This is where all the "xxxxxx-kde4" apps reside, ready to spring to life when you type their name. Putting the KDE4 apps aside and bringing the older, more familiar versions to the forefront is a simple matter of renaming and symlinking.

For this example, we'll use Kopete. First, move the offending KDE4 version out of the way; execute the following command: $ sudo mv /usr/lib/kde4/bin/kopete /usr/lib/kde4/bin/kopete-kde4 This renames the program to "kopete-kde4", so you can still start the program if you need to. Next, we symlink (create a shortcut to) the "standard" kopete: $ sudo ln -s /usr/bin/kopete /usr/lib/kde4/bin/ This basically says "create a soft link to /usr/bin/kopete in the /usr/lib/kde4/bin directory". The resulting link file will also be named kopete, letting you call the KDE3 version normally.

While this method works well for smaller apps (Kopete, Konsole, etc), I haven't been able to trust it with more essential programs, such as KDM. KDM has been especially annoying; supposedly you can configure it to use the old KDM by running "sudo dpkg-reconfigure kdm" and choosing "kdm" from the menu, but this hasn't worked for me, and I've tried several times.